Processing Requests
The next section of this training guide focuses on entering, updating, and processing requests.
My Request
The My Request window may be used to create a new request and review any requests created by you or assigned to you (i.e., your logged in user account). Requests can also be created and updated in the Requests window where request created and assigned to all users may be seen.
Requests may also be created in the Request Calendar window which is discussed later in this user guide.
Click on the Request icon in the main dashboard, use the search menu to open the MyRequest window, or select the CRM > My Request menu item.

Grid View:
Individual Requests are identified by Document No. and displayed row by row.

Edit View:
Click on the Request 'Document No'. (highlighted in blue) to view an individual Request in the edit / detail view. 
Entering a New Request
To create a new Request, click on the Request icon in the main dashboard, use the search menu to open the MyRequest window, or select the CRM > My Request menu item.

This will open the My Request grid window shown below.
New Requests may be added and updated in either the grid view or edit (detail) view.
Grid View:

Click on the 'New’ button above the grid view to add a new Request.

This will insert a new row in the grid view for entering the Request information.

To enter your request information in the edit(detail) view mode, just click in the Document No field in the new Request record and the new record will display as follows.
Edit (detail) View:

All required information is designated with an asterisk * beside the field name. Required fields ‘*’ with no information entered or defaulted are shown in Red Text.
You can now create your new Request by selecting values from the available drop-down list choices and by typing information in the text fields.
Required Fields & Fields with Default Values
|
Field: |
Type: |
Description: |
|
Document No |
Numeric |
System assigns the next available request number when new request is saved
|
|
Request Type * |
List Name |
User defined type of request; for example, service, support, maintenance, purchase, etc. |
|
Summary * |
Text |
Describe what is being requested; for example, repair lock in room 210, update software on laptops, HVAC maintenance required, etc. |
|
Assigned To * |
List User Name |
Person responsible for fulfilling the request; if not selected, defaults to person entering the request when the request is saved; list includes Users who are also Business Partners with the sales representative checkbox selected on the Business Partner record; User is added to the Update Recipient list |
|
Priority *
|
List |
Priority of the request; system defined list; default value is ‘Medium’ |
|
Confidentiality *
|
List |
Relates to level of request confidentiality for request associated with business partners; defaults to ‘Partner Confidential’; used for Partner web portal access |
|
User/Contact |
List Name-Email
|
Can reference either the User entering the request or be a business partner Contact if a Business Partner has been associated with the request; User is added to the Update Recipient list |
|
User Importance
|
List |
User priority of the request; system defined list; defaults value is ‘Medium’ |
|
Role
|
List |
Selecting a Role will add all Users associated with that role to the Update Recipients list; Update Recipients will receive notifications related to the request; defaults to the logged in user’s role; can be set to default to another role by setting the fields Value Preference; no value is defaulted if created from calendar view |
|
Next Action |
List |
Next action to be taken; system defined list; defaults to Follow Up; other value is None |
|
Status
|
List |
User defined status values; status list associated with the Request Type status category displays; defaults once Request Type is selected |
|
Start Date
|
Date |
Planned date to begin the Request; defaults to current date when Request Status field is selected upon save |
Now that we have reviewed both the required fields and those with default values, we will create our new Request by assigning values to these fields and any other optional fields that may help us define and categorize our new Request.
Once you have completed entering information, click on the Save button below the grid or edit window.

The Request Document No will be assigned upon saving your work.
Here is a screen capture after updating and saving the new Request.
Grid View:

Edit (detail) View:

As you can see, other optional fields such as Category, Group, and Department have been assigned to this request.
Requests
The Requests window can also be used to create a request and review any request. Requests created by and assigned to all users may be seen here.
Use the menu search to open the Requests window or select the CRM > Requests menu item.
Grid View:

Request Tab – Edit View:

My Request Tab:
In order to review Requests in more detail, we will discuss the field definitions according to the edit / detail view panel they display in. We will use the 'My Request' window in our examples.
My Request Tab – Top Panel:

The Organization, Document Number, and Start Date appear at the top portion of this window. The document number will be system assigned if not entered by the user. The Start Date may be updated when Request is added, but can be modified. It may also be updated by changing the Status to an ‘Open’ value. The Close Date may be manually entered or automatically updated by a ‘Closed’ status being selected. The optional Resolution code can be manually updated.
Select a Status from the list of valid Statuses defined earlier. Statuses listed are based upon the Status Category associated with the Request Type assigned to the Request.
Request > Request Type > Status Category > Request Statuses
(request statuses display on requests based on this relationship)
My Request Tab – Request Panel:

The optional Product field identifies an item which is either purchased and / or sold in your organization that may be associated with the request. Products may be used when generating Orders or Invoices from Requests. The optional Business Partner field may also identify a partner associated with the request. They can include Vendor, Customer, Employee or Sales / Service Rep. The User/Contact is the contact name of a person associated with the Business Partner if specified.
The required Request Type displays the Request type selected by the submitter and the Category and Group can also be optionally selected to further define the Request. The Related Request field allows you to refer to an existing request, if relevant.
The required Text Summary for this Request allows free form text entry of a recap of this request. The Priority indicates the importance of this Request. Select a value of Urgent, High, Medium, or Low. The User Importance indicates the importance of this Request from the perspective of the User who entered it. Select a value of Urgent, High, Medium, Low or Minor.
The Escalated check box indicates that this request has been escalated or raised in importance.
Request Updates:
Updates to the Request may be entered in the "Action Details” area of the request by typing in a Result note and updating the other task related informational fields shown below.
My Request Tab - Action Details Panel:

In the Action Details area, you will find the following fields. The required Assigned To indicates the Sales / Service Representative assigned to this Request. If left blank, it will default to the user entering the request. The Role field value defaults from the Assigned To user’s role but may also be selected from the drop-down list. All users with that Role will be added to the Update Recipients list. If the Role is left blank, then only the request Creator and Assigned To user will be added to the Update Recipients list.
The Task Status can be complete, in progress, or non-started. In the Results (required to create an update record) field enter any task update information that you want to be sent to those receiving notifications or emails. The Start Time and End Time are for each task or result that is reported against. The End Time will be blanked out upon re-assignment of the request and can be updated once scheduled or completed. The Date next action is next scheduled Date for an action to occur for this request. Next Action can be none or follow up.
Select ‘Save’ after completing entry of your Action Details. The Action Detail Results will now be visible in the Request Updates tab window and update notifications will be emailed out based on your Update Recipients list.
The Reference area is used to associate a request with an existing department or project.
My Request Tab - Reference Panel:

The Department and Project ID are user selectable for a Department or Project that the request is associated with.
The History area is used to review request dates and users who have created or updated the request.
My Request Tab - History Panel:

The History area displays the following fields. The Date Last Action indicates the last time an action occurred for this request. The Last Alert indicates the last time an alert was issued for this Request. The Last Result displays the result of the last “Action Details” update made. The Created field shows the date this request was created. The 'Created by User' is the User who created this request. The Updated field shows the date that this request was updated. The Updated By field displays the user who updated this request. These fields are all maintained by the System.
The Processed field is system maintained and indicates that the Request has been closed and can only be re-opened with the Reopen Request application.
Updates Tab:
The Updates tab displays any “Action Details” with Results which have been entered that updated the Request. The fields in this window correspond to the fields in the Request tab and display the historical data for each of your Action Details updates.
Updates Tab – Grid View:
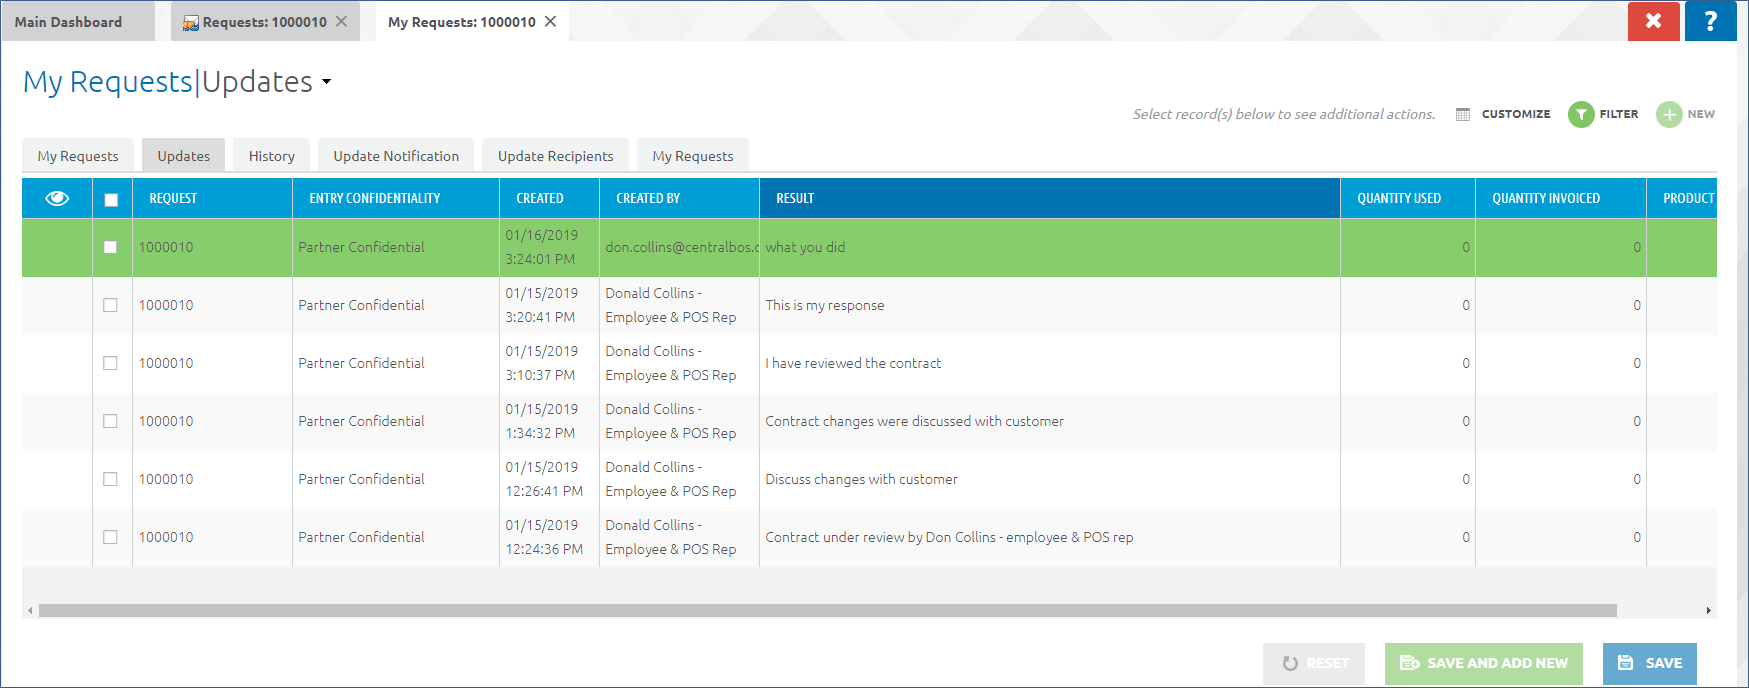
In this Window you can modify the Entry Confidentiality field.
You may also update the Quantity Used, Invoiced Quantity and Product Used. These fields are used when creating orders or invoices from a Request.
History Tab:
The History tab displays changes to a Request. The data displayed represents the old (changed from) values. The new data is in the Request. In this example, we see that the Status field was updated from a Null value to a selected value ‘Open’ (which now appears in the Request).

Update Notification Tab:
The Update Notification tab indicates those who will be added to the Update Recipient list to receive updates for this specific request. In this tab you may enter any User/Contact who should receive notifications when this Request is updated.
This is in addition to the current User(s) assigned to the Request, the User who entered the Requests and any Users that should be notified of updates to this Request based on the Request Type, Request Category or Request Group.
User/Contacts entered here will be automatically added to the Update Recipients list.

Update Recipients Tab:
The Update Recipients tab displays the Users who will receive notifications and / or emails when this Request is updated, due, overdue, escalated, inactive, etc. Their notification may be based upon the request category, type, or group’s associated update notification list or from being added manually through the Update Notification window. This tab is read only.

Email Notifications
Based upon the Request Type settings and User Notification Type setting, email notifications may also be sent to recipients.
Request Email Updates:

Request – Attachments
To add attachments to your Request, select More Options > Attach

Select Upload Attachments and Save.

Request – Notes
To add notes to your Request, select History > Notes

Enter new notes or reply to existing notes.

Managing Requests
Once Requests have been entered you can see those requests that are assigned to you and require some action (are not closed), by selecting the My Request button on the Main Dashboard window. This button also indicates the number of Active Requests.
In this example, we see that the User who is currently logged into CBOS, has 9 requests assigned to them or created by them.

To enter an update for this task you may click on the Document No. and enter updates in the grid window or open the My Request tab in the detail edit mode. The updates are then entered in the Action Details panel and then saved as shown below. The Resultfield is used to describe what actions or tasks were performed.

This update will now appear in the Updates Tab window and notifications and emails will be sent based upon your notification and update recipients lists.

Other Request related fields such as status, summary, priority, etc. may also be updated and saved as required. These changed do not appear in the Updates tab window.
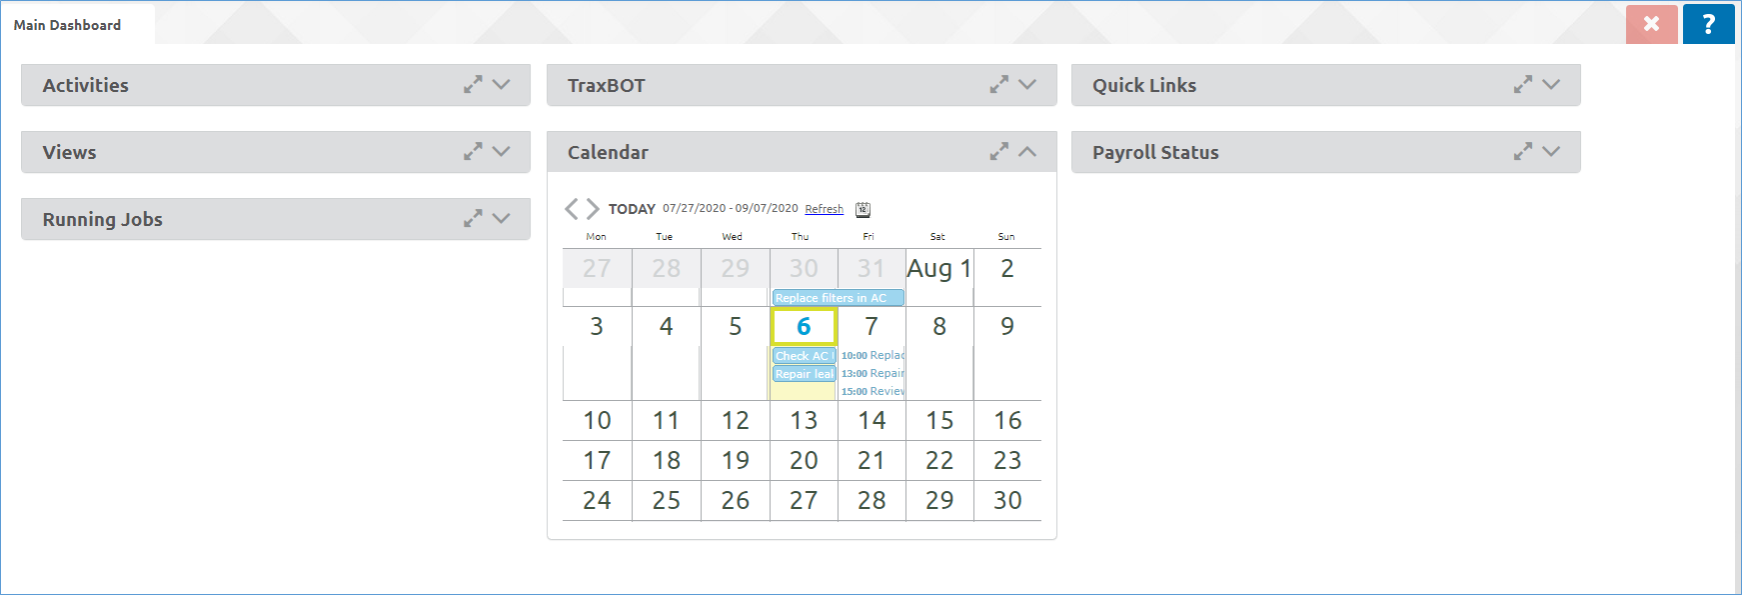
Requests - Calendar
The Request module comes with a Request Calendar that can be used to enter new Requests and view existing Requests. The Request Calendar will only display Requests created from the Calendar view where you are the creator or have been assigned the request. It also includes Requests created outside the Calendar view with ‘Date Next Action’ entered.
Main Dashboard - Calendar
Click on a date to add a new request from the Calendar view. The following values default and should be reviewed / updated before clicking on the green check box to create the new Request. Additional Request information may be added once the Request has been created.
Default values for new Request:

-
Start Plan / Start Time updates the ‘Start Time’ date / time values in the Request
-
Complete Plan / End Time updates the ‘End Time’ date / time values in the Request
Updates should be entered prior to clicking the green checkbox to create the new Request.

Select the green checkbox to save and create the new Request.
The new Request will appear as follows in the detail view:

-
The ‘Start Time’ and ‘End Time’ values determine the Calendar display date / time
-
Additional Request information may be updated as required
Click on any request in the Calendar view to see a summary of that request.
Then click on magnifying glass to zoom into the full Request.

Full Request record:

Click on the "Calendar" icon to view multiple calendar formats:

Drill down to Request summary and then zoom to full Request is available on all calendar views by clicking on the Request record. Filter by Request Type is also available.
Calendar view (five-day week):

Current Day view:

Selected future Day view:

Monthly view:

Scroll down and click on the down arrow to see a graphical analysis of Request Types:

-
Select the Request Type filter to view all or specific types of Requests
Recurring Requests
Future functionality … Recurring Requests can be setup by adding the recurrence frequency detail and assigning the original request to be used as a template for creating the recurring requests.
Create Recurring Requests
Menu Path: Requests > Recurring Request


Request Reporting
In addition to the various reports that can be created by filtering your grid views, the Request module comes with this report.
This report has a multitude of filtering parameters and output that can be configured using the Report Wizard. These configurations may be saved as Report ‘Print Formats’ that be rerun on demand. Reports may also be exported to excel spreadsheets.
Requests Report
Menu Path: Reports > Requests > Requests Report
Report Parameters:

-
When the ‘Show Updates’ parameter is selected, all of the Action Updates for a given Request are displayed in date order in the Update column on the report
-
If the ‘Show Updates’ parameter is not selected only the Last Update will display in the Update column on the report
Report Output – Show Updates:

Report Output – Show Updates Not Selected:
